|

|
|
|
What is in this tutorial?
|
|
|
This tutorial contains a step by step -guide to creating a simple image with ArtPaint. This tutorial will familiarize you with the basic principles of using ArtPaint. After going through this tutorial you should be able to create images with ArtPaint and save them to the disk.
|

|
|
|
Step 1: Starting the program
|

|
You can start the program by double-clicking on its icon. After you have done this you are presented with a set of windows. The windows will be arranged in somewhat similar manner as in the picture on the left. If you see that some of the windows are missing from your screen there is no need to worry. You will only be needing one of the window's at this stage. The window that you will need right now is labeled "Untitled - 1" and it has a grey background with lighter grey stripes in it. After you have located this window you can proceed on to step 2.
|

|
|
|
Step 2: Creating a canvas
|

|
The window labeled "Untitled - 1" is the window that you will be doing the painting in. But first you should define what size of an image you want to create. You can find in the lower right corner of the window a box with two numeric fields in them. To these fields you can enter the size of the image that you want to create. The numbers mean how many pixels is the image's height and width. For the purpose of this tutorial put the width to about 300 and height to about 150. After you have done this push the button labeled "Create Canvas" just below the two fields. This then creates an area where you can start painting.
|

|
|
|
Step 3: Selecting colors
|

|
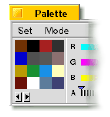
Before you actually start painting you should probably select a suitable color. You can select a new color from the palette window. That window can be opened from the menu in your paint window. Just select the submenu "Window" and from that the entry "Show Palette Window". The palette-window contains some sliders on the right side and a grid with different colors in it on the left side. If you see a color in the grid that you like you can select it by clicking on it. If you do not see a suitable color in the grid you can adjust the colors with the sliders on the right. After you have chosen a suitable color go back to the paint window.
|

|
|
|
Step 4: Selecting tools
|

|
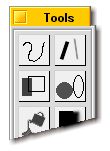
Now that you have a color selected you should still select a tool that you'd like to use. The tools can be selected from tool window. This window can be opened from the same place in the menu that you used to open the palette window, just select "Show Tool Window" instead of "Show Palette Window". From the tool-window you can select a tool to be used by clicking on its icon. For the purpose of this tutorial click on the tool which has two rectangles in its icon. That tool can be used to draw rectangles on the image.
|

|
|
|
Step 5: Setting up the tools
|

|
With the tool selected you could just draw into the image, but before that it might be a good idea to set up the tool a little. You can change the settings for the tool by opening a tool settings window. This can be done by selecting from the menu "Window" and then "Show Tool Setup Window". After you have set the settings to your liking you can paint with that tool by clicking with the mouse on the image.
|

|
|
|
Step 6: Saving the image
|

|
After you have created the image that you like, you can save it by selecting from the menu "File" the item "Save Image As...". This brings up a standard BeOS save dialog where you can choose the appropriate directory and enter a file name. In addition to that the save panel contains a pop-up-menu for selecting the proper save-format and a button labeled "Settings..." that brings up a window where you can change settings that affect how the image is saved. Select the appropriate file-format (for example JPEG), type in a suitable name and press "Save". That stores your image on the disk for later use and concludes this tutorial. Now you should know the basics of using ArtPaint and you can go on and explore its functionality.
|

|


